下午想把一个11.2.0.2实例的memory_target AMM内存初始化参数修改到2000M,改好后重启发现实例起不来了,出现了ORA-00845错误:
[oracle@rh2 ~]$
[oracle@rh2 ~]$ sqlplus  / as sysdba

SQL*Plus: Release 11.2.0.2.0 Production on Tue May 3 19:43:50 2011

Copyright (c) 1982, 2010, Oracle.  All rights reserved.

Connected to an idle instance.

SQL> startup nomount;
ORA-00845: MEMORY_TARGET not supported on this system

======================= ALERT.LOG======================

Starting ORACLE instance (normal)
WARNING: You are trying to use the MEMORY_TARGET feature.
This feature requires the /dev/shm file system to be mounted for at least 2097152000 bytes.
/dev/shm is either not mounted or is mounted with available space less than this size.
Please fix this so that MEMORY_TARGET can work as expected.
Current available is 1871466496 and used is 200790016 bytes.
Ensure that the mount point is /dev/shm for this directory.
memory_target needs larger /dev/shm
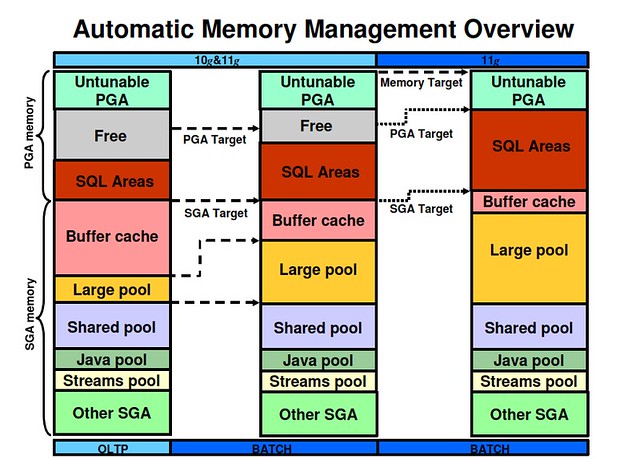
看起来是因为采用了Automatic Memory Management的特性,所以Oracle采用了一种基于POSIX的共享内存使用风格,在AMM中Oracle不像之前版本那样利用”一整块”内存作为SGA,而是使用一块块小的”chunk”,以满足SGA与PGA之前交换内存的目的,具体可以参考下图:

针对上述ORA-00845错误,我们需要修改映射内存文件夹/dev/shm的装载参数,针对正在运行的Linux操作系统,可以remount这个tmpfs装载点,如:
[root@rh2 ~]# umount /dev/shm
umount: /dev/shm: device is busy
umount: /dev/shm: device is busy

[root@rh2 ~]# ls /dev/shm
JOXSHM_EXT_0_PROD1_8323079   JOXSHM_EXT_25_PROD1_8323079  ora_+ASM1_7569414_11
JOXSHM_EXT_10_PROD1_8323079  JOXSHM_EXT_26_PROD1_8323079  ora_+ASM1_7569414_12
............

/* 可以看到如果ASM实例也使用AMM的话同样会在/dev/shm目录下产生内存映像
    为了umount该装载点,我们不得不首先shutdown ASM instance ! */

[root@rh2 ~]# su - grid
[grid@rh2 ~]$ sqlplus  / as sysdba

SQL*Plus: Release 11.2.0.2.0 Production on Tue May 3 20:05:24 2011

Copyright (c) 1982, 2010, Oracle.  All rights reserved.

Connected to:
Oracle Database 11g Enterprise Edition Release 11.2.0.2.0 - 64bit Production
With the Real Application Clusters and Automatic Storage Management options

SQL> shutdown immediate;
ORA-01031: insufficient privileges
SQL> exit
Disconnected from Oracle Database 11g Enterprise Edition Release 11.2.0.2.0 - 64bit Production
With the Real Application Clusters and Automatic Storage Management options
[grid@rh2 ~]$ sqlplus  / as sysasm

SQL*Plus: Release 11.2.0.2.0 Production on Tue May 3 20:05:32 2011

Copyright (c) 1982, 2010, Oracle.  All rights reserved.

Connected to:
Oracle Database 11g Enterprise Edition Release 11.2.0.2.0 - 64bit Production
With the Real Application Clusters and Automatic Storage Management options

SQL> shutdown immediate;
ORA-15097: cannot SHUTDOWN ASM instance with connected client (process 1576)
SQL> shutdown abort;
ASM instance shutdown
SQL> exit
Disconnected from Oracle Database 11g Enterprise Edition Release 11.2.0.2.0 - 64bit Production
With the Real Application Clusters and Automatic Storage Management options

[root@rh2 ~]# umount /dev/shm

[root@rh2 ~]# mount -t tmpfs shmfs -o size=4000m /dev/shm

/* 这里的size指定了shm目录的装载大小,4000m可能对你的系统仍然不够,
    那么你有理由设一个更大的值  */


[root@rh2 ~]# mount|grep shmfs
shmfs on /dev/shm type tmpfs (rw,size=4000m)

Startup ASM...........

[root@rh2 ~]# su - oracle
[oracle@rh2 ~]$ sqlplus  / as sysdba

SQL*Plus: Release 11.2.0.2.0 Production on Tue May 3 20:09:40 2011

Copyright (c) 1982, 2010, Oracle.  All rights reserved.

Connected to an idle instance.

SQL> startup nomount;
ORACLE instance started.

Total System Global Area 2087780352 bytes
Fixed Size                  2228072 bytes
Variable Size            1476395160 bytes
Database Buffers          603979776 bytes
Redo Buffers                5177344 bytes

/* 实例启动成功! */
上述umount/mount的方式只在操作系统的此次生命周期中生效,如果重启的话shmfs目录仍会以默认方式装载;如果需要永久生效的话,我们需要修改系统参数文件/etc/fstab中的shm条目:
/* 修改前的shm装载参数 */

[root@rh2 ~]# grep shm /etc/fstab
tmpfs                   /dev/shm                tmpfs   defaults        0 0

/* 修改后的shm装载参数 */

[root@rh2 ~]# grep shm /etc/fstab
tmpfs                   /dev/shm                tmpfs   rw,size=4000m   0 0

mount -o remount
不需要重启,记得……
主要是实例需要重启,OS只要remount就可以用了